
Creative Christmas tree crafts are a wonderful way to bring a personal touch to your holiday decor while making your home feel extra festive. From miniature evergreen trees made with simple materials to imaginative handmade designs, there are countless ways to create something truly special. I love how these DIY projects turn everyday supplies into charming decorations that reflect your style and creativity. Whether you prefer natural textures, colorful ornaments, rustic-inspired details, or modern minimalist designs, you can find a craft that fits beautifully into your Christmas decorating plans. These creative ideas are also perfect for family crafting sessions, thoughtful handmade gifts, and adding unique accents to shelves, tabletops, and cozy corners. Get inspired by these creative Christmas tree crafts and discover how easy it can be to make your own holiday decor feel magical and memorable.
Minimalist Wall Christmas Tree With Fairy Lights
This wall-mounted Christmas tree is made from thin white horizontal bars arranged in a triangular silhouette, with warm fairy lights wrapped around the structure. Dark beaded garlands sweep across the branches, while white heart ornaments, silver snowflakes, small baubles, and a starburst topper complete the design. Wrapped gifts and softly glowing spherical decorations sit at the base, creating a cozy holiday scene against a simple gray wall. I love how the combination of warm light and delicate ornaments makes the tree feel festive without taking up much floor space.
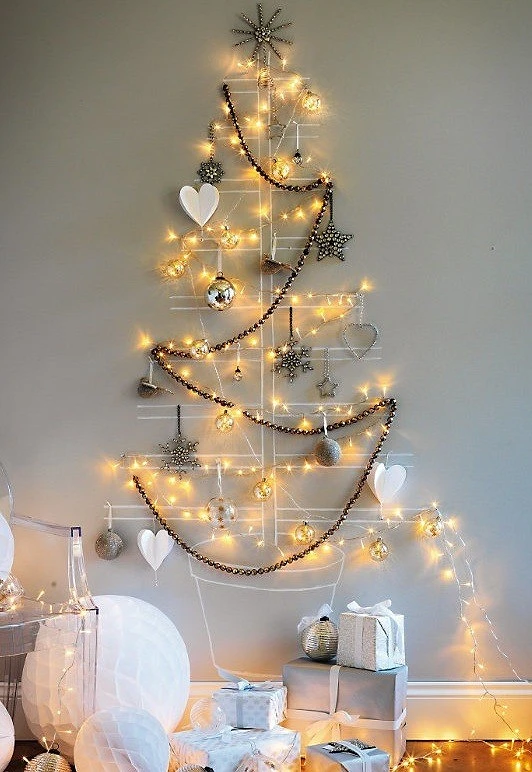
The wall-mounted construction is particularly practical for small apartments, narrow living rooms, or homes where a traditional tree would interfere with everyday movement. Because the design is open rather than densely filled with branches, it preserves the visual lightness of the room. The warm lights also create depth against the neutral wall, while the dark garland provides contrast and helps define the tree’s shape.
To recreate this look, I would start by arranging lightweight horizontal supports in progressively shorter lengths, securing them firmly to an appropriate frame or wall-mounting system. I would then weave a strand of warm-white LEDs through the structure before adding a dark garland and a carefully selected collection of ornaments. Keeping the palette limited to white, silver, gold, and dark metallic accents helps the handmade tree look coordinated. For safety, I would use lightweight decorations and secure the entire installation properly, especially if children or pets share the home.
DIY Christmas Tree With Sheer White Ribbon
This handmade Christmas tree features wide, translucent white ribbon wrapped in loose, flowing layers around a cone-shaped structure. Tiny warm lights shine through the sheer material, creating a soft glow, while a few textured red and brown ornaments add restrained touches of color. A large brown star sits at the top, and a white reindeer figurine stands beside the finished tree. The pale walls and warm wood flooring keep the setting simple, allowing the ribbon’s airy texture to become the main attraction.
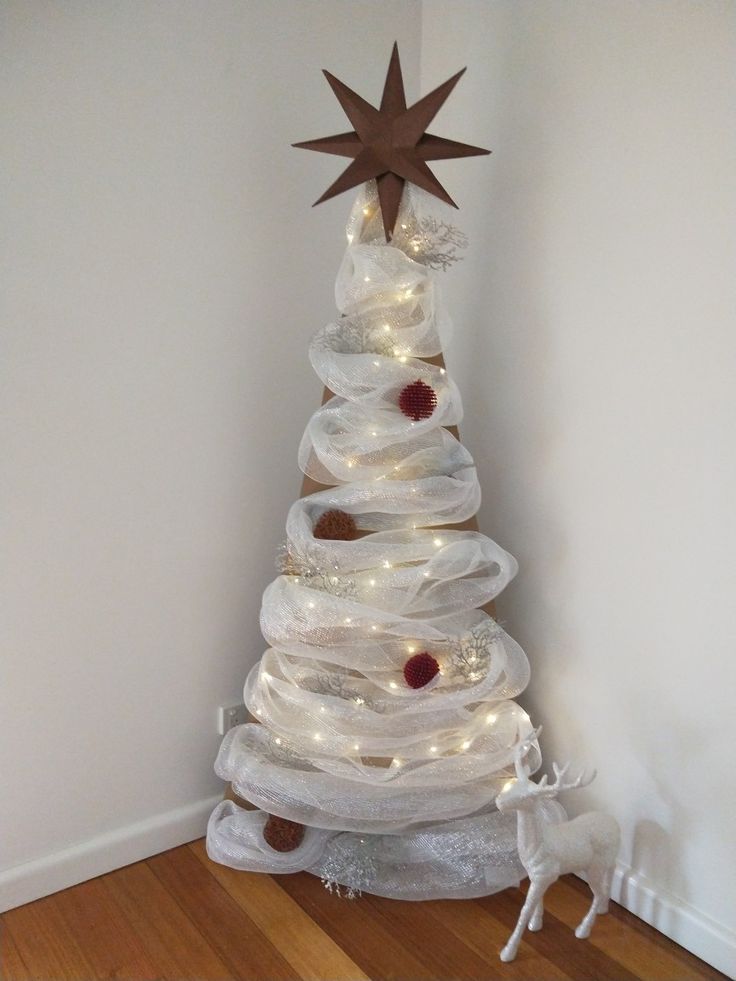
What makes this design appealing to me is the way it creates the impression of a full Christmas tree without using conventional branches. The flowing ribbon establishes volume and movement, while the lights make the translucent material appear almost luminous. Its narrow silhouette also makes it suitable for a corner where a traditional tree might feel too bulky. The restrained ornament selection prevents the delicate construction from becoming visually crowded.
To make a similar version, I would use a stable cone-shaped frame and wrap it with wide mesh or sheer ribbon, allowing the material to form relaxed, overlapping waves. A strand of battery-operated fairy lights can be tucked between the layers, provided the lights are suitable for the material and do not overheat. I would finish the tree with a statement star and just a few ornaments in complementary colors. A simple white animal figurine beside the base would reinforce the understated, storybook atmosphere without distracting from the handmade centerpiece.
Creative Christmas Tree Made From a Wooden Ladder
An open wooden ladder becomes an unexpected Christmas tree in this creative installation. The ladder is decorated with gold tinsel wrapped around its wooden supports, while red, gold, green, and champagne-colored baubles hang at different heights inside the triangular frame. White fluffy material covers the floor underneath, creating the appearance of snow, and several additional ornaments are scattered across the display. The combination of dark wood and traditional Christmas colors gives this DIY design a bold, playful character.
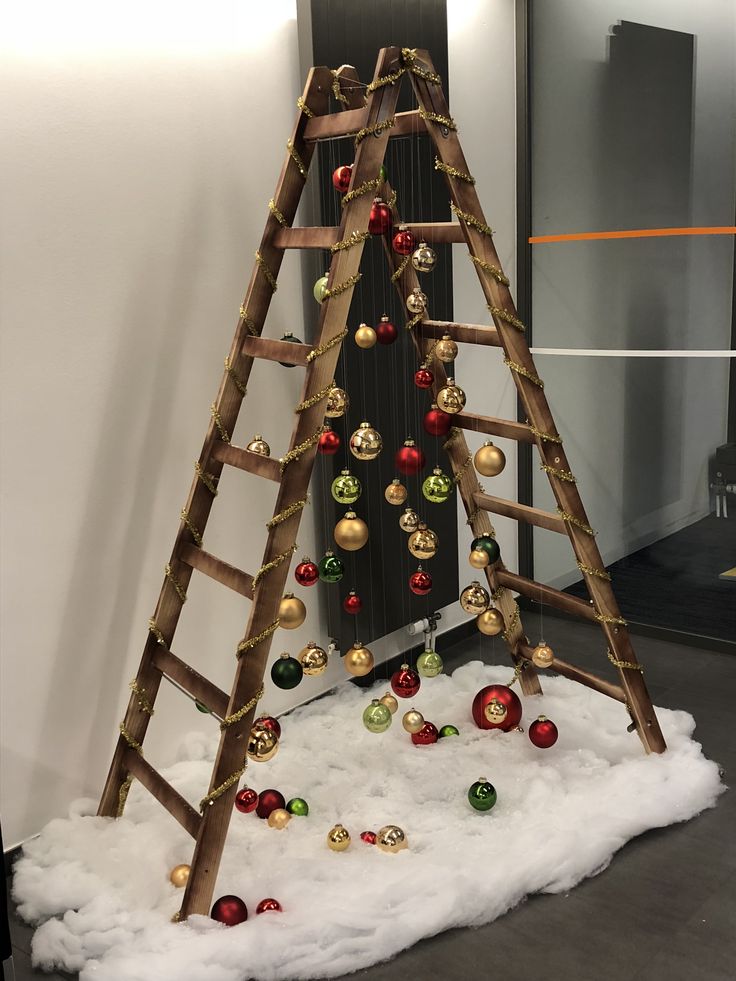
I find this idea especially interesting because it uses an existing object as the foundation for seasonal decorating. The ladder’s open structure creates a natural triangular outline, and the suspended ornaments remain visible from multiple angles. Unlike a conventional tree, it leaves the central area open, allowing the decorations to appear almost weightless. The arrangement can also accommodate ornaments of different sizes without requiring dense branches.
For my own version, I would begin with a stable ladder that can safely support the lightweight decorations. I would wrap the rails with tinsel, then suspend baubles from the upper rungs using clear thread or decorative ribbon. Varying the hanging lengths would create depth and keep the arrangement visually balanced. White fabric or a soft snow-effect covering could complete the base, although I would keep it away from electrical connections and any heat sources. Since ladders can tip, I would secure the structure against movement and avoid climbing on it once decorated.
Rustic Pinecone Christmas Tree Craft
This compact Christmas tree is constructed from numerous pinecones arranged tightly into a tapered, evergreen-inspired shape. The pinecones vary in size and shade, creating a richly textured surface in natural brown, tan, and muted gray tones. The tree stands on a silver pedestal, with a metallic ornament and several loose pinecones arranged nearby. A neutral background and a simple tabletop setting emphasize the intricate texture of the handmade piece rather than competing with it.
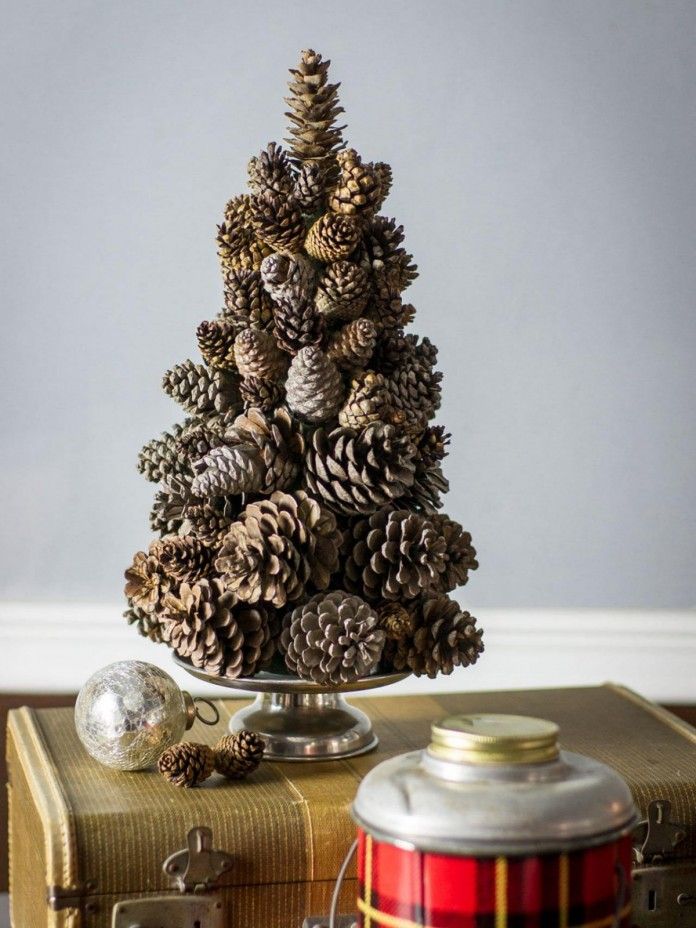
What I particularly appreciate about this craft is that its visual interest comes almost entirely from the natural shapes of the materials. Each pinecone adds a different pattern, so the finished tree looks detailed even without lights, ribbons, or colorful decorations. Its small scale makes it suitable for a console, side table, or seasonal display where a full-size tree would be impractical. The pedestal also lifts the arrangement, giving the finished piece a more polished presentation.
To create a similar design, I would collect pinecones in several sizes, clean them thoroughly, and allow them to dry completely before assembly. A sturdy cone-shaped base would help maintain the tree’s proportions, while smaller pinecones could fill gaps between larger pieces. I would attach the materials securely with an appropriate craft adhesive and finish the arrangement with a simple metal stand or shallow decorative base. Because natural pinecones can be uneven, I would work gradually from the bottom upward, checking the silhouette from every side as I go.
DIY Christmas Tree Made From Cardboard Tubes
This unusual Christmas tree uses hollow circular tubes arranged in different sizes to form a triangular wall display. The pale gray and white tubes overlap to create a sculptural pattern, while gold baubles sit inside selected openings. Small gold bows and delicate metallic garlands connect the individual elements, giving the design a cohesive festive appearance. The patterned wallpaper behind it adds subtle visual detail, but the tree itself remains the main focus.
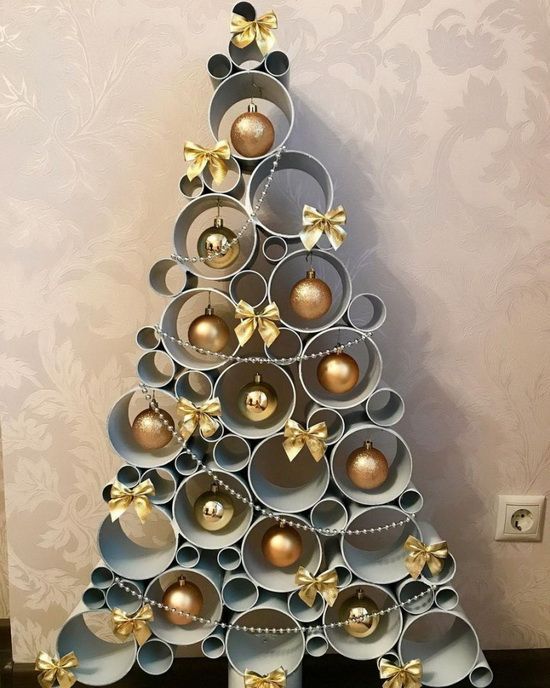
I like how this craft turns simple geometric shapes into both a Christmas decoration and a decorative wall feature. The open circular compartments provide built-in spaces for displaying ornaments, so the baubles feel integrated into the design rather than simply attached to the outside. The mostly neutral palette also allows the gold accents to stand out. Because the structure sits against the wall, it offers an alternative to a traditional floor-standing tree for homes with limited space.
For a DIY interpretation, I would use lightweight cardboard tubes or other suitable hollow cylindrical forms in several diameters. I would arrange them on a flat backing in a triangular composition, placing larger circles toward the bottom and smaller ones near the top. Before securing the structure, I would test different arrangements to create a balanced pattern and ensure that the ornament compartments are large enough. A few gold baubles, small bows, and a fine metallic garland would provide a festive finish without overcrowding the geometric design.
Modern Wooden Slat Christmas Tree With Red Ornaments
This handmade tree is assembled from pale wooden slats arranged horizontally around a central vertical support. The slats vary in length and angle, creating a loose, sculptural silhouette that widens toward the bottom. Bright red baubles hang from the structure on black-and-white cords, while warm, blurred lights in the background create a soft festive atmosphere. The natural wood and classic red ornaments give the design a simple, contemporary appearance.
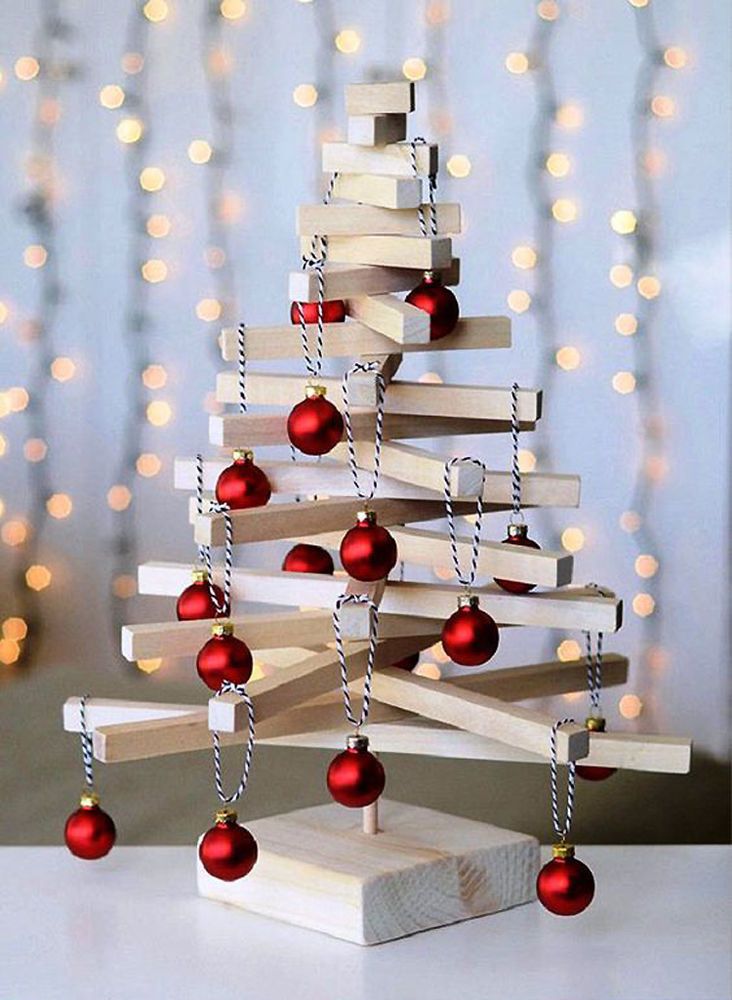
The open construction is one of the strongest features of this idea. It creates the recognizable outline of a Christmas tree without the bulk of traditional branches, making it suitable for a tabletop or a compact seasonal display. The pale slats provide a neutral foundation, while the red ornaments introduce a clear focal color. I also like the contrast between the clean wooden shapes and the rounded baubles, which keeps the composition from feeling too rigid.
To make this tree, I would arrange lightweight slats of graduated lengths around a secure central support, fixing them firmly so they cannot shift under the weight of the ornaments. A simple rectangular wooden base would help keep the finished structure upright. I would then add red baubles on cords of varying lengths, distributing them across the silhouette rather than clustering them all in one area. The most important detail is stability: every horizontal piece should be securely attached, and the finished craft should stand on a level surface away from busy walkways.
Green Mesh Christmas Tree With White Snowflakes
This handmade Christmas tree is formed from multiple layers of green mesh fabric arranged around a conical frame. The mesh creates a textured, branch-like silhouette, with darker green layers visible beneath lighter yellow-green sections. White snowflakes, small musical-note ornaments, and other pale decorative shapes are scattered throughout the tree. The overall effect is playful and handmade, with the open mesh allowing the underlying layers to remain visible.
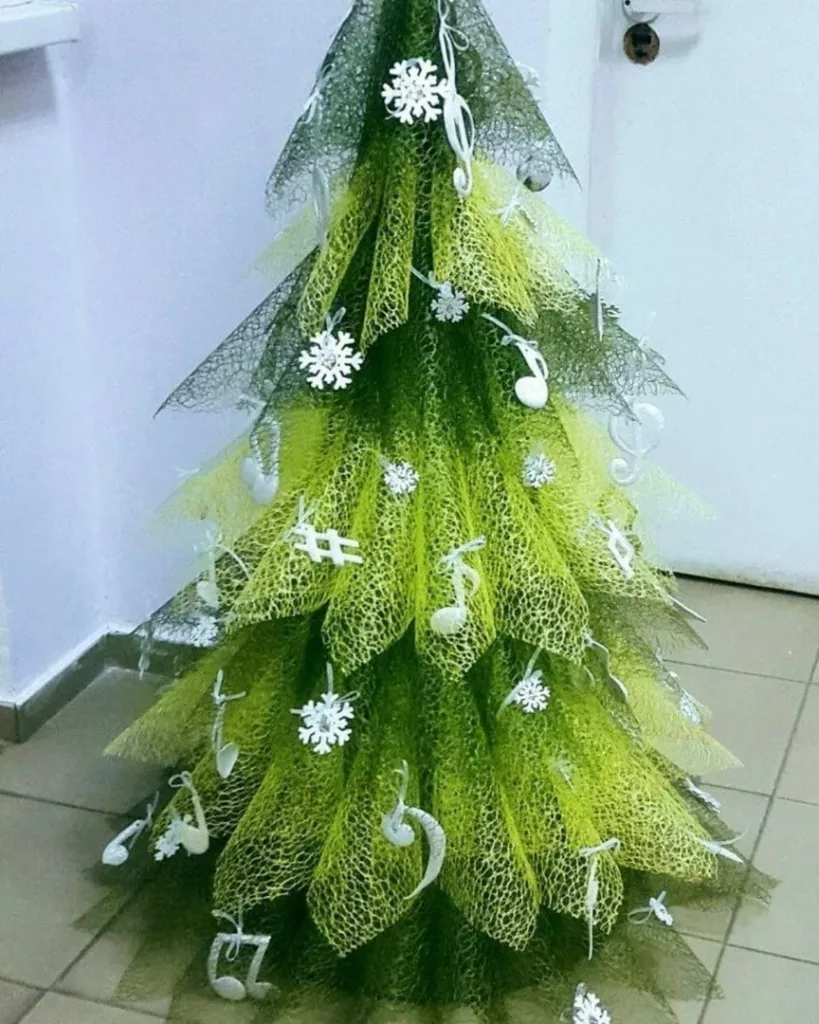
I find this design appealing for anyone who wants a colorful Christmas centerpiece without relying on a traditional artificial tree. The layered mesh creates volume while remaining visually lightweight, and the white decorations stand out clearly against the green background. The irregular edges also give the tree movement and texture. Since the material is flexible, it offers plenty of opportunities to experiment with the silhouette and adjust individual layers during assembly.
To recreate this idea, I would build a stable cone-shaped base and attach strips or gathered sections of green mesh, beginning at the bottom and working upward. Overlapping the layers would help conceal the frame while preserving the airy appearance. I would then distribute white snowflakes and small ornaments throughout the tree, keeping their spacing relatively even. For a more refined finish, I would choose one or two ornament styles and repeat them throughout the arrangement. I would also ensure that the mesh is secured well and kept away from candles, heaters, and other heat sources.
Wall Christmas Tree Made From Evergreen Garland
This wall-mounted Christmas tree is created from horizontal lengths of evergreen garland arranged in a wide triangular outline. The garland sections become progressively shorter toward the top, while warm-white fairy lights trace the shape and illuminate the greenery. Small red baubles and pinecones provide traditional holiday accents. Positioned above the floor, the design leaves the surrounding furniture and floor area largely unobstructed, making it a practical alternative to a freestanding tree.

The simplicity of this arrangement is what makes it so effective. The evergreen garland immediately communicates the familiar shape and texture of a Christmas tree, while the wall-mounted layout keeps the room feeling open. The repeated horizontal lines create a clear structure, and the warm lights emphasize the outline after dark. I particularly like the restrained use of red ornaments, which introduces color without overwhelming the greenery.
To achieve a similar look, I would mark out a triangular outline on the wall before arranging the garland in graduated horizontal sections. Each section should be attached with suitable fasteners that can support its weight without damaging the wall unnecessarily. I would weave the fairy lights along the greenery and place red baubles and pinecones at intervals to maintain visual balance. If I were decorating a small living room, I would keep the surrounding area relatively uncluttered so the wall tree could function as the main seasonal focal point.
Rustic Branch Christmas Tree With Fairy Lights
This wall-mounted Christmas tree is assembled from horizontal natural branches arranged from shortest at the top to longest at the bottom. A small star marks the peak, while delicate fairy lights wind around the branches and illuminate the ornaments. The decorations include metallic baubles in gold, silver, brown, and muted pink, along with star-shaped ornaments and geometric accents. Wrapped gifts sit beneath the display, completing the festive composition against a plain light-colored wall.
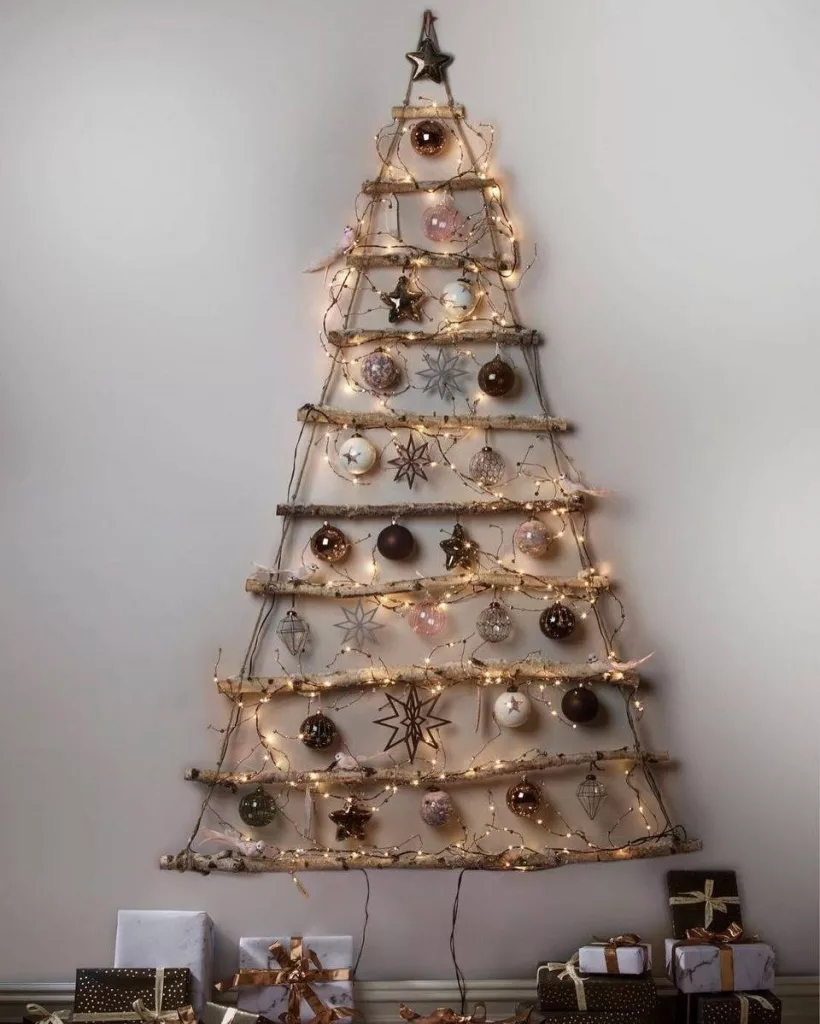
What stands out to me is the balance between the natural irregularity of the branches and the sparkle of the decorations. The branches create an open, triangular structure, while the lights connect the individual levels into one cohesive design. The understated color palette gives the tree a coordinated appearance without relying on a large quantity of ornaments. Its wall-mounted construction is also useful for smaller homes because it creates a strong seasonal statement without occupying much floor space.
For a similar project, I would choose dry, sturdy branches and arrange them by length before attaching them to a secure vertical support or suitable wall-mounted system. I would leave enough space between the levels for the ornaments to hang freely. Warm-white fairy lights would highlight the natural textures, while a limited selection of metallic baubles would keep the design visually consistent. I would finish the arrangement with a small star and a few wrapped gifts below. Since the branches are exposed, I would check them carefully for loose bark, sharp edges, and unstable attachment points before decorating.
Modern Sculptural Christmas Tree Made From Wooden Boards
This final Christmas tree is a sculptural arrangement of pale wooden boards stacked and crossed at different angles around a central structure. The projecting boards create a loose, irregular triangular silhouette, with small lights positioned among the layers. Clear and silver ornaments, white ribbon bows, and delicate star decorations add a festive finish without hiding the construction. The tree stands on a broad wooden base in a softly lit interior, demonstrating how simple materials can become a distinctive seasonal centerpiece.

I love how this design makes the construction itself part of the decoration. Rather than imitating the dense shape of a traditional tree, it celebrates open space, intersecting lines, and natural wood tones. The varied angles give the arrangement depth, while the pale ornaments and subtle lights complement the boards without competing with their shape. It also offers an interesting alternative for anyone who prefers a handmade decorative object that feels more like a piece of sculpture than a conventional Christmas tree.
To create a similar version, I would plan the arrangement of the boards on the floor first, experimenting with their lengths and angles until the silhouette feels balanced. A strong central support and a stable base are essential because the boards extend in several directions. Once the structure is secure, I would add small lights and lightweight ornaments, distributing them across the different levels. I would keep the decoration restrained, using silver, white, and transparent details to preserve the clean, architectural appearance. For safety, I would make sure that no board can slide or tip and that the lights are suitable for use around the chosen materials.
DIY Wooden Christmas Tree With Oranges
This handmade Christmas tree features a striking geometric silhouette made from intersecting black wooden slats. The diagonal pieces form a series of diamond-shaped openings that gradually narrow toward the top, creating the unmistakable outline of a Christmas tree without traditional branches. Small oranges, some accompanied by green leaves, are tucked between the wooden sections, while warm fairy lights illuminate the bottom. The entire arrangement stands against a simple cream-colored wall, allowing the dark frame and golden-orange fruit to become the main visual features.
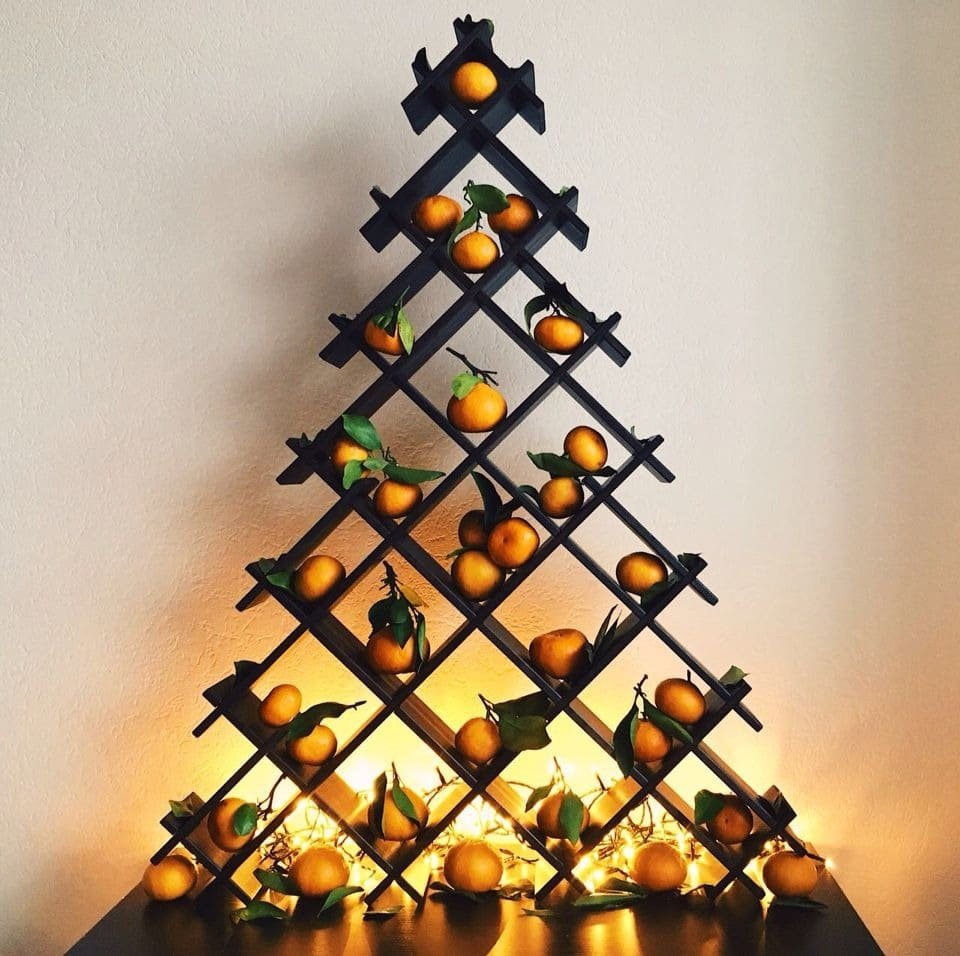
What I find particularly appealing about this design is its combination of structure and natural decoration. The black lattice creates a strong graphic outline, while the oranges introduce warmth, color, and an unexpected seasonal detail. Unlike a full-sized evergreen, this open framework does not visually overwhelm the room. It also offers a creative way to display fruit as part of holiday styling, especially when placed on a console or another sturdy surface.
To recreate this idea, I would start with a stable wooden lattice arranged in a triangular shape, making sure the joints are secure and the base cannot tip over. Artificial oranges are a practical option if I want the display to last throughout the season without worrying about spoilage. A strand of warm-white LED lights placed around the bottom completes the look without competing with the fruit. I would keep the surrounding decoration simple so that the unusual silhouette remains the centerpiece.
Minimalist Christmas Tree Made From String Lights
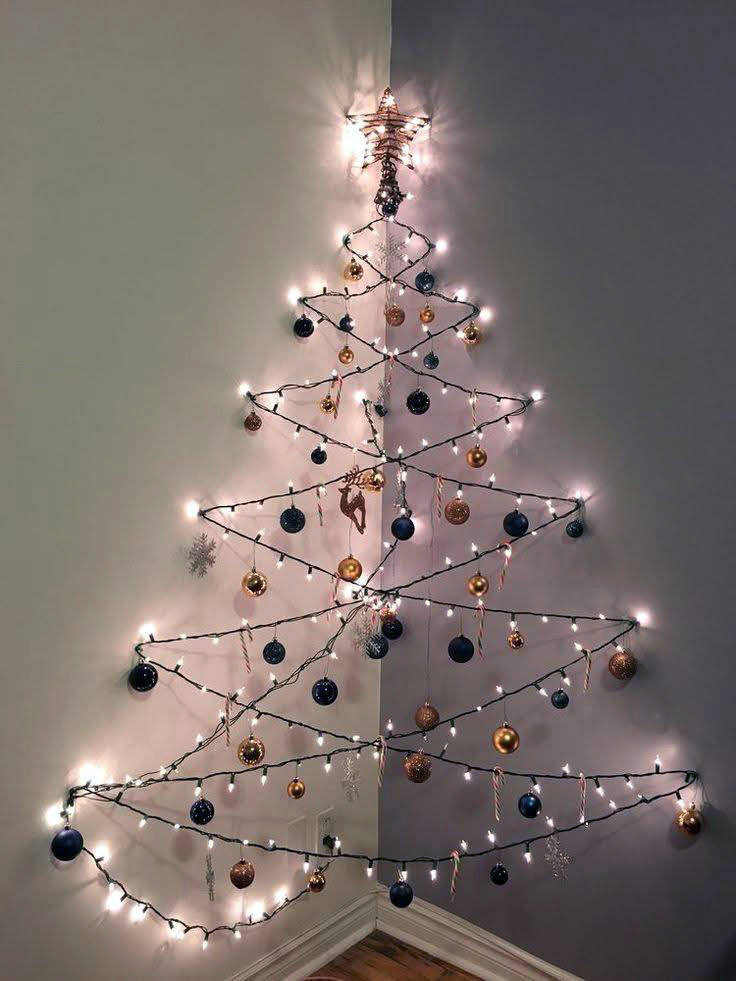
This creative Christmas tree is formed entirely from a strand of string lights arranged in a large zigzag pattern across two adjoining walls. The lines become progressively shorter toward the top, producing a triangular tree silhouette that follows the corner of the room. Small ornaments in gold, bronze, black, and blue hang from the illuminated strands, while a glowing star crowns the arrangement. The pale wall on one side and darker gray wall on the other create a subtle contrast that makes the lights especially noticeable.
I like how this idea transforms an otherwise unused wall corner into a festive focal point. Because the design has no bulky branches or traditional tree stand, it preserves valuable floor space and works well in compact apartments, bedrooms, or shared living areas. The open outline also allows the wall colors to remain visible, giving the decoration a light, airy appearance. The hanging ornaments provide enough detail to make the arrangement feel like a real Christmas tree rather than simply a lighting display.
To achieve a similar effect, I would mark the intended triangular outline lightly before attaching the lights with suitable removable hooks or clips. I would then distribute the ornaments along the zigzag lines, alternating colors and sizes to keep the composition balanced. A star at the top gives the design a recognizable finishing touch. For safety, I would use indoor-rated LED lights, avoid overloading electrical outlets, and secure the strands properly rather than leaving them loose.
White Christmas Tree With Red and Gold Ornaments
This handmade tree has a flat, stylized silhouette made from white panels arranged in overlapping triangular layers. It stands on a chair against a white brick wall, with fluffy white material gathered around its lower section. Red and gold baubles decorate the surface, and several ornaments are finished with small red or white bows. A large red bow and star detail crown the tree, while another oversized bow decorates the lower front, creating a coordinated festive look.
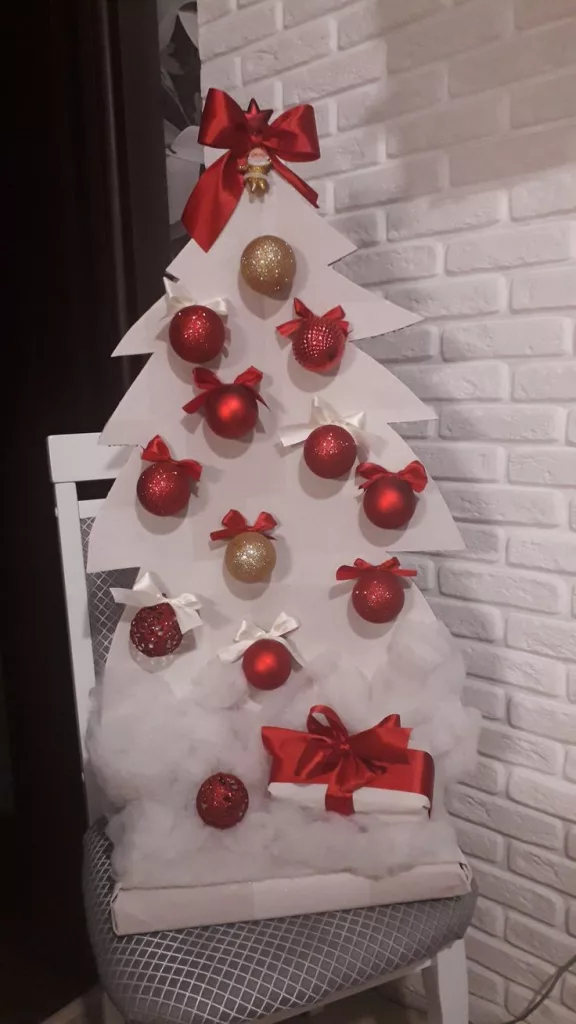
For me, the charm of this design lies in its limited color palette and simple construction. White provides a clean background for the red and gold decorations, allowing even a relatively small number of ornaments to make a strong impression. The flat shape also differs from a traditional tree, making it suitable for a handmade holiday display where space or access to a full evergreen may be limited. The chair raises the arrangement above the floor and turns it into a compact decorative feature.
I would recreate this look using lightweight, securely connected panels cut into progressively smaller triangular shapes. The ornaments can be attached with hooks or other suitable fasteners, with bows used to repeat the red accent throughout the composition. If I wanted a fuller appearance, I would arrange white fabric or soft batting around the base, keeping it away from heat sources. A stable support is essential, particularly if the finished tree is placed on a chair or another piece of furniture.
Colorful Christmas Tree Made From Rubber Gloves
This unconventional Christmas tree is assembled from numerous rubber gloves arranged in overlapping layers. The gloves alternate between mint green, turquoise, blue, and purple, creating a full triangular shape that widens toward the bottom. Small Christmas ornaments in red and silver are scattered across the colorful surface, and a pale hand-shaped decoration sits at the top. The display stands on a counter in an office-like setting, with a blue wall and an information board visible behind it.

I think this is one of the most imaginative ideas in the collection because it turns an everyday workplace item into an unexpected holiday decoration. The repeated glove shapes create texture and movement, while the cool colors make the tree look playful rather than traditional. The red ornaments provide small contrasting accents that help the overall arrangement feel festive. This design could be particularly appropriate for a medical office, school, workplace, or community event where a humorous handmade display would encourage conversation.
To make a similar craft, I would first create a stable central support and attach the gloves in overlapping rows, keeping their fingers directed outward to imitate the layered appearance of branches. Gloves in three or four coordinated colors would produce a more organized result than a random assortment. Lightweight ornaments could be added near the ends of the gloves, provided they are securely fastened. I would also make sure that any gloves used for decoration are clean, dry, and appropriate for the intended setting.
Macrame Christmas Tree Wall Hanging With Greenery
This wall-mounted Christmas tree combines cream-colored macrame with evergreen branches arranged in several horizontal layers. The woven textile forms a triangular outline with intricate knotted patterns, scalloped edges, and long fringe along the bottom. Small cream ornaments and clusters of red berries are distributed among the greenery, while a woven star sits at the top. The design is displayed against a pale wall, with a traditional evergreen tree partially visible on the left and a decorated wooden cabinet on the right.
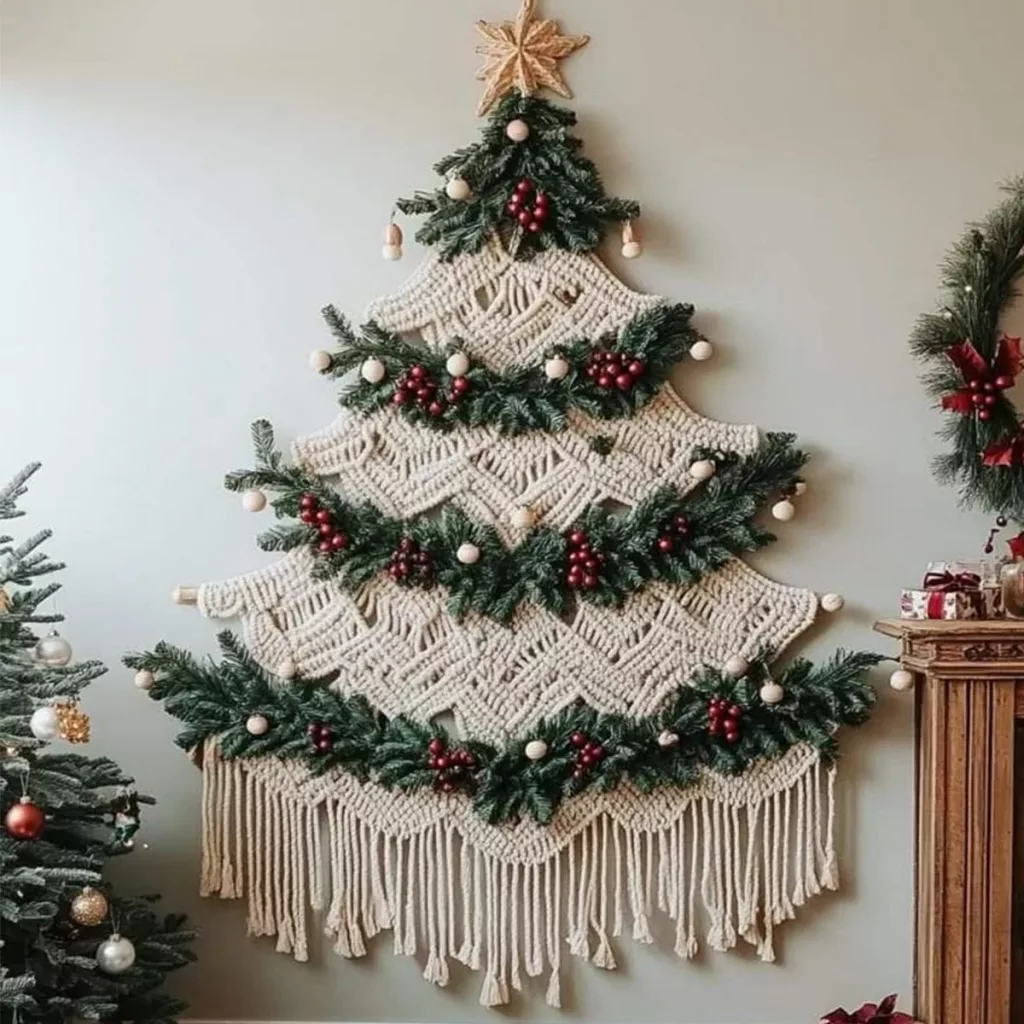
What makes this design stand out to me is the contrast between the soft, detailed macrame and the natural texture of the evergreen branches. The textile creates a clear tree shape, while the greenery adds depth and a familiar seasonal scent if fresh branches are used. Because the decoration hangs vertically, it can bring Christmas character to a wall without requiring a separate floor-standing tree. Its restrained combination of cream, green, and red also keeps the composition visually cohesive.
To achieve a similar effect, I would begin with a securely mounted macrame piece or a handmade knotted textile arranged in a triangular silhouette. Lightweight evergreen sprigs can then be attached in horizontal layers, with small ornaments and berry accents placed at intervals. I would pay particular attention to the weight of the greenery and use a wall attachment suitable for the finished display. If I wanted a longer-lasting version, artificial evergreen branches would be a practical alternative that preserves the same layered appearance.
DIY Wooden Shelf Christmas Tree With Fairy Lights
This original Christmas tree is constructed from a series of pale wooden shelves arranged in progressively smaller tiers around a central vertical support. The shelves create a stepped triangular outline, with warm string lights illuminating the edges and small decorative objects displayed throughout. Black, white, silver, and patterned ornaments hang from the structure, while a large black star forms the top decoration. Wrapped gifts and a small arrangement of candles sit around the base, completing the festive display in a modern room with white cabinetry and dark flooring.
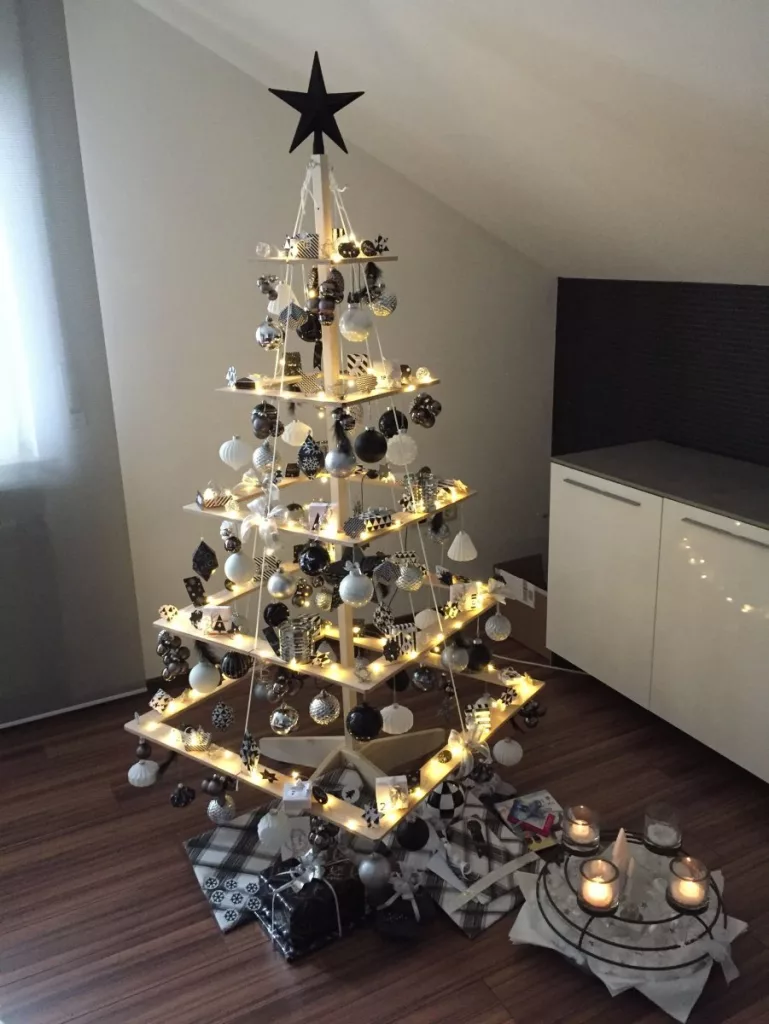
I particularly like how this design combines the appearance of a Christmas tree with the practical function of shelving. Each level provides space for ornaments, miniature decorations, or other lightweight seasonal accessories, making the structure more versatile than a traditional tree. The contrast between pale shelves and dark ornaments creates a coordinated look, while the warm lights soften the overall effect. It also allows decorations to be arranged at different heights, giving the display depth without relying on dense branches.
If I were making this tree, I would focus first on stability and accurate measurements so that the shelves become gradually smaller toward the top. The central support should hold the structure firmly, and every shelf needs to be secured before ornaments are added. I would repeat the black, white, and silver palette across the tiers rather than filling every space with unrelated decorations. Warm LED lighting around the shelf edges would provide the final glow while keeping the overall design clean and contemporary.
Green Mesh Christmas Tree With Red Ornaments
This decorative Christmas tree is made from wide loops of green mesh ribbon gathered into a full triangular shape and arranged against a white paneled door. The loosely curled material creates a layered, ruffled texture that resembles abundant branches. Red and white baubles are tucked into the mesh, and a large red glitter star sits at the top. A thin red decorative strand winds through the arrangement, connecting the ornaments visually and reinforcing the traditional holiday color scheme.
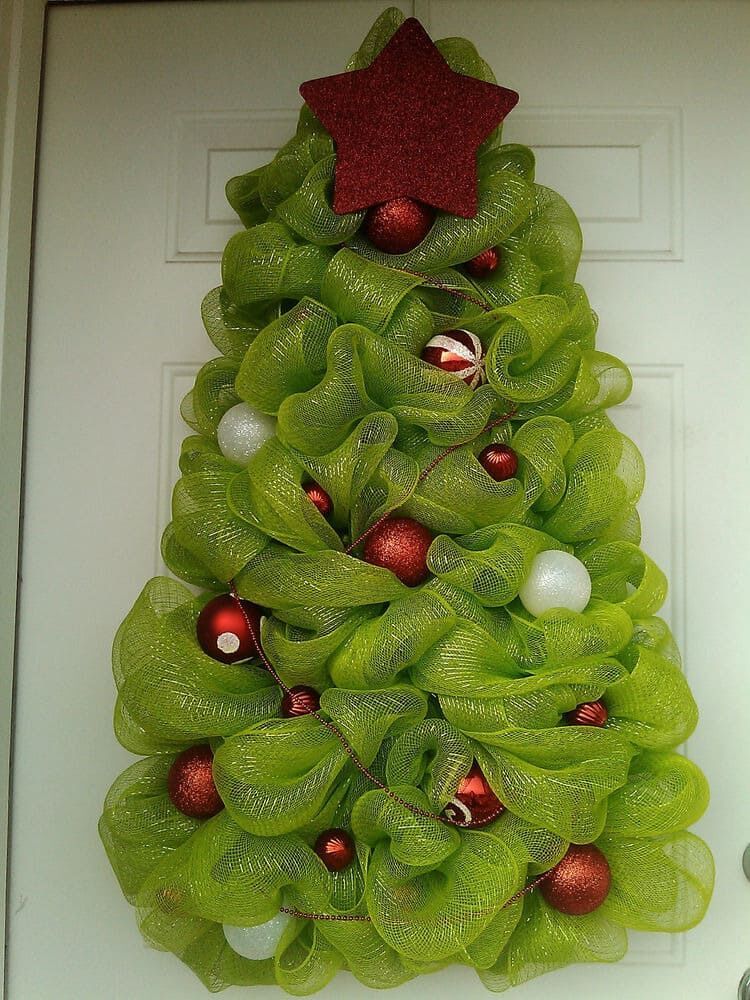
I find this idea especially useful for homes where a wall-mounted or door-mounted decoration is preferable to a conventional tree. The mesh creates volume without requiring a heavy frame covered in branches, and its flexible structure makes it possible to adjust the silhouette as the craft takes shape. The combination of green, red, and white is immediately recognizable as Christmas decor, while the large star gives the design a clear focal point. It also makes a strong visual statement in an otherwise simple doorway.
To create this look, I would attach gathered loops of mesh to a secure backing, working from the top downward and gradually increasing the width of each row. The loops should be distributed evenly so the tree appears full without losing its triangular outline. Red and white ornaments can then be inserted into the gaps, with the largest accent reserved for the top. Before hanging the finished piece, I would check that the attachment can support its weight and that the door can still open and close comfortably.
Natural Pinecone Christmas Tree With Dried Oranges
This small handmade Christmas tree is covered with pinecones in shades of gray, cream, and muted brown, with green evergreen sprigs placed between them. Dried orange slices, cinnamon sticks, small decorative shapes, and other natural-looking details are scattered across the surface. A star-shaped topper made from woven material crowns the tree, while twine ties and small pale accents add further texture. The arrangement sits on a windowsill beside a large window, where the outdoor light emphasizes its detailed surface.

For me, this design demonstrates how a collection of simple natural materials can create a distinctive holiday centerpiece. Pinecones form the main body of the tree, giving it a dense, irregular texture, while the dried citrus and cinnamon introduce warm colors and familiar seasonal associations. The green sprigs break up the neutral palette, and the handmade star completes the silhouette. Its compact size makes it suitable for a windowsill, desk, or small tabletop where a full-size tree would be impractical.
I would start with a cone-shaped base and attach the pinecones in overlapping rows, filling visible gaps with small evergreen pieces. Dried orange slices, cinnamon sticks, and twine details can be added afterward so that the decoration remains balanced rather than crowded. Collecting pinecones is an affordable way to source materials, although I would make sure they are clean and completely dry before using them indoors. Keeping the finished tree away from direct heat and open flames is also important because dried natural materials can be flammable.
Ladder Christmas Tree with Greenery and Colorful Lights
This creative Christmas tree features a tall, open structure made from light-colored wooden poles arranged in a triangular shape. Green evergreen garlands wind around the frame in separated tiers, creating the familiar outline of a Christmas tree without filling the entire interior with branches. Multicolored string lights, small ornaments, and wrapped presents complete the display. I particularly like how the natural greenery contrasts with the pale wood, while the brown leather armchair and warm-toned floor make the surrounding living room feel comfortable and inviting.
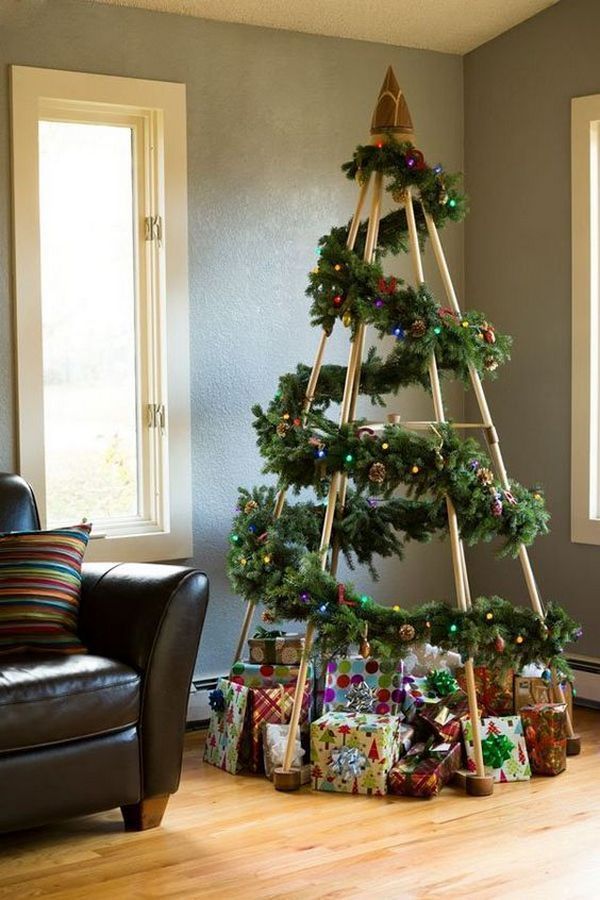
What makes this design appealing is its open construction. The spaces between the garlands allow the wall behind the tree to remain visible, giving the decoration a lighter appearance than a dense traditional tree. The presents underneath also become part of the overall display rather than simply sitting beside the tree. I would consider this idea especially useful for anyone who wants a festive focal point without overwhelming the room with greenery.
To recreate the look, I would start with a stable wooden frame and attach artificial evergreen garlands at several heights. Small ornaments and colorful lights can then be distributed throughout the branches. Make sure the structure is securely supported, particularly if you plan to place wrapped gifts around its base. Battery-operated LED lights can help simplify the arrangement and reduce visible cords.
Elegant Seashell Christmas Tree Decorations
Three sculptural Christmas trees made from seashells stand on a tabletop in front of a softly lit window. Each tree has a tapered silhouette, with cream, ivory, and pale beige shells layered closely together to create a richly textured surface. The shapes and sizes of the shells vary, adding natural detail to the otherwise monochromatic decorations. Rounded, light-colored bases support the trees, while a small dish of gold-toned ornaments sits nearby. I find the combination of delicate shell textures and warm neutral colors particularly appealing.
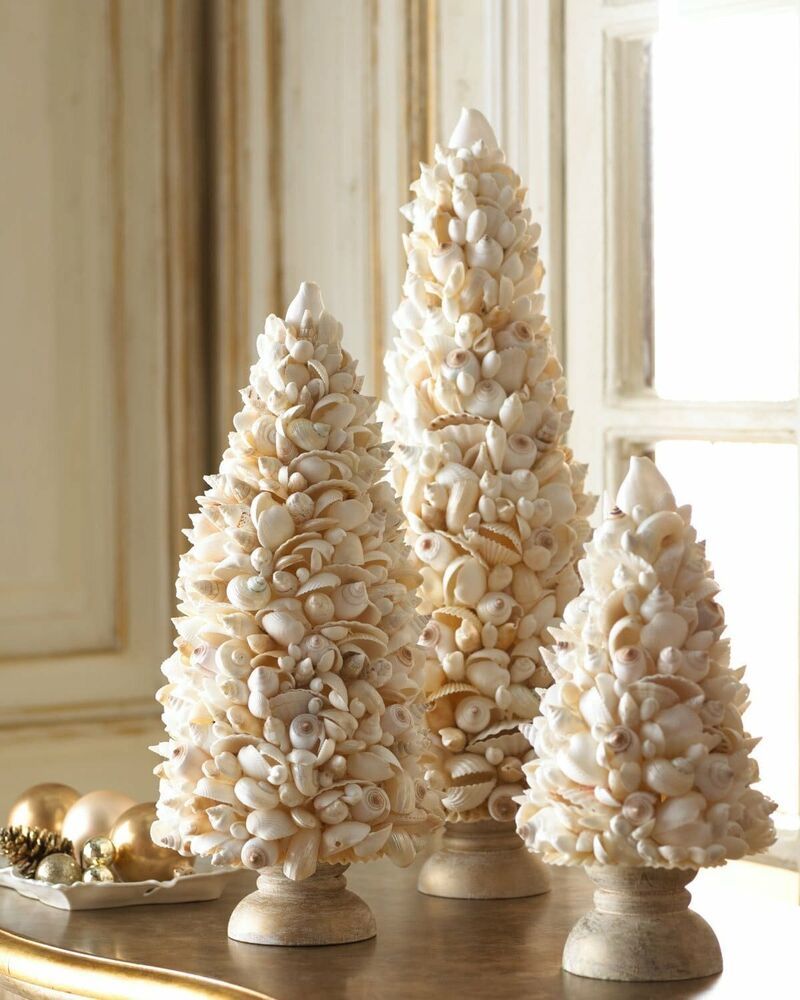
These miniature trees offer a distinctive alternative to conventional holiday greenery. Their pale palette makes them easy to incorporate into a room without competing with existing furnishings, and their compact size allows them to decorate a console, side table, or mantel. Displaying three trees of different heights creates a more interesting composition than using a single object, while keeping the materials and colors consistent maintains a cohesive appearance.
For a similar craft, I would use a cone-shaped base and carefully attach cleaned seashells in overlapping layers, working from the bottom toward the top. A mixture of larger and smaller shells can fill gaps and add visual variety. Because shells can be fragile, I would handle them gently and use an adhesive suitable for both the shell material and the chosen base. Keeping the finished trees in a dry indoor location will help preserve their appearance.
Pinecone Christmas Tree with Red Ornaments
This small Christmas tree is assembled from numerous pinecones arranged tightly into a cone-shaped form. Their overlapping scales create a natural, layered texture, while small red berries and round red ornaments provide festive accents. A few pale evergreen sprigs extend around the sides, softening the outline and adding contrast to the brown and gray tones of the pinecones. The tree sits on a red base, with additional greenery arranged nearby. I love how the natural materials make this decoration feel detailed and substantial despite its relatively small size.
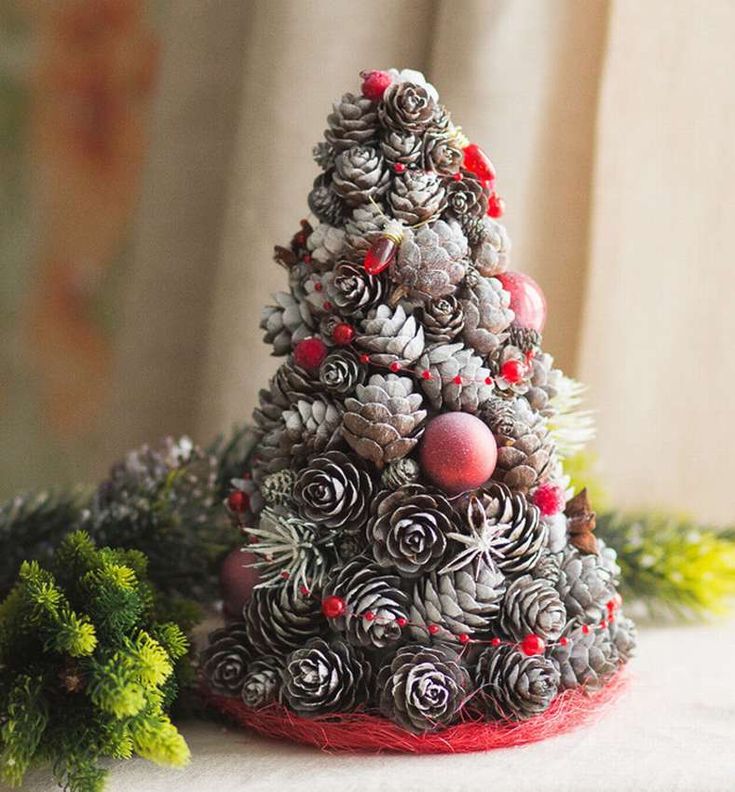
The appeal of a pinecone tree lies in the way its surface creates visual interest without needing many extra decorations. Each pinecone has a slightly different shape, so the finished piece feels organic rather than perfectly uniform. Red accents establish a recognizable holiday color scheme, while the restrained use of additional greenery keeps the pinecones as the main feature. This makes the design suitable for a tabletop, shelf, or small festive display.
To make one, I would begin with a firm cone-shaped base and attach clean, completely dry pinecones from the bottom upward. Larger pinecones can cover the lower portion, with smaller ones filling the gaps near the top. Once the structure is secure, I would add a few small ornaments and artificial berries. If collecting pinecones outdoors, I would inspect and clean them thoroughly before bringing them indoors, and I would keep the finished decoration away from open flames and direct heat.
Driftwood Christmas Tree Wall Decoration
Several pieces of irregular driftwood are arranged horizontally on a light-colored wall, with the longest branch at the bottom and progressively shorter pieces toward the top. Together, they form a simple triangular Christmas tree shape. Small evergreen sprigs, pinecones, and tiny decorative figures rest on the branches, while a strand of warm-white lights follows the outline and illuminates the display. The wood’s natural variations in color and texture give the tree an understated appearance. I find the simplicity of this design especially charming because the silhouette is recognizable without being filled with conventional branches.
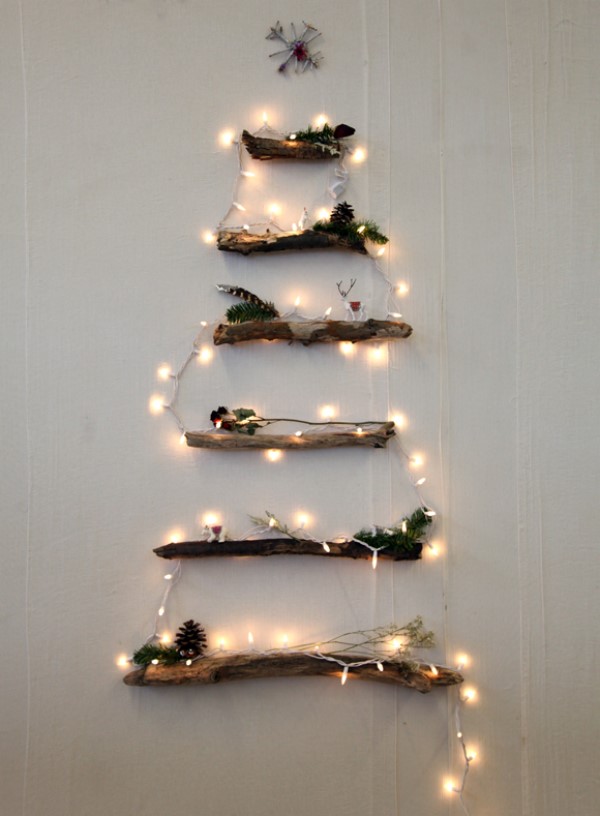
This arrangement works well when floor space is limited or when a household wants to create a festive focal point on an otherwise empty wall. The horizontal branches provide small surfaces for decorations, and the open spaces between them keep the composition from feeling heavy. The string lights also help define the triangular shape, making the tree visible even when the individual decorative details are small.
For a similar project, I would select branches with enough strength to support lightweight decorations and arrange them on the floor before attaching them to the wall. Using a gradual progression in branch length helps create a balanced tree silhouette. I would secure every piece with appropriate wall fixings rather than relying on the weight of the decorations to hold it in place. A few evergreen sprigs and a warm light strand would be enough to complete the design without covering up the wood’s natural character.
DIY Christmas Tree Made from Wooden Clothes Hangers
Several wooden clothes hangers are arranged in overlapping triangular layers against a dark wall to create the outline of a large Christmas tree. Their natural wood tones contrast with the deep background, while pale star ornaments, round yellow-green baubles, and small decorative shapes hang from the frame. A strand of delicate string lights weaves across the arrangement, adding a soft glow. I find this idea particularly inventive because it transforms an everyday household object into a festive wall decoration with a recognizable tree silhouette.
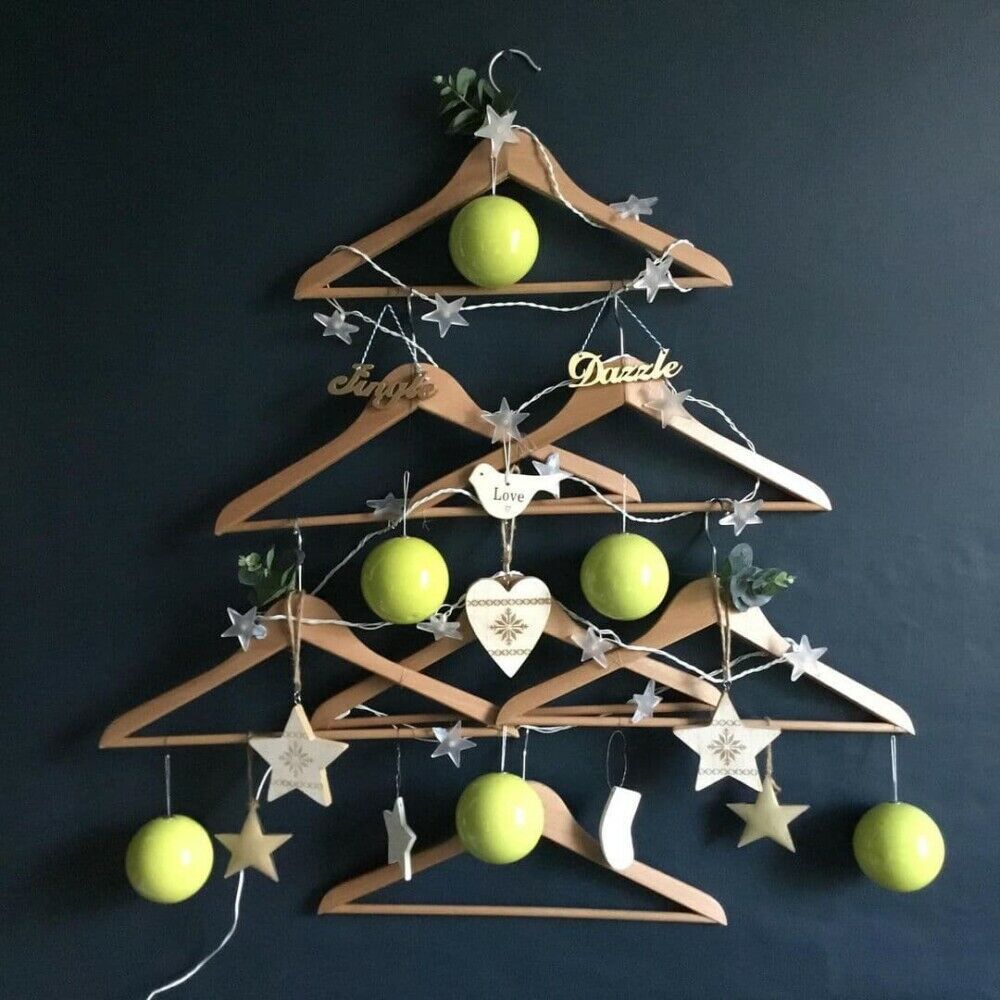
The main advantage of this design is that it leaves the floor completely clear. The open construction also makes the wall color part of the overall composition, allowing the dark background to emphasize the hangers and ornaments. Repeating the triangular forms creates a clear visual rhythm, while the different hanging decorations keep the arrangement from looking too rigid.
To make a similar wall tree, I would lay the hangers out on the floor first and adjust their positions until the overall shape looks balanced. I would then secure the arrangement to the wall using appropriate supports, making sure that both the hangers and ornaments are held safely in place. Small ornaments and lightweight decorations are best for this project because the hangers are not intended to support heavy objects. A fine strand of lights can be added last, following the shape of the tree without hiding the structure.
DIY Outdoor Christmas Tree with Wooden Slats
This freestanding Christmas tree is constructed from dark horizontal slats arranged in progressively shorter lengths to create a broad triangular silhouette. The slats are attached to a central vertical support, which stands on a simple wooden base. A large red bow sits at the top, while small warm-white lights are distributed across the dark surfaces. The tree is positioned outside against horizontal exterior siding, with a dark shutter visible to one side. I like the strong graphic effect created by the contrast between the dark structure, the tiny lights, and the oversized red bow.
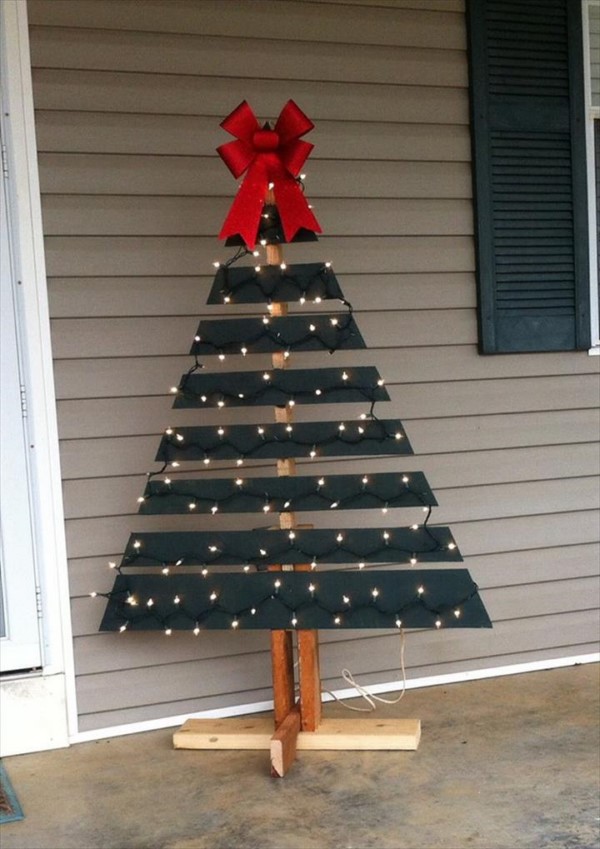
The design is effective because it uses a limited number of materials to create a recognizable Christmas tree with a clear outline. The horizontal pieces give the decoration a structured appearance, while the lights provide a festive detail without adding visual clutter. Its vertical orientation also makes use of height rather than width, which can be helpful for a porch or narrow outdoor area.
To create a similar version, I would build a sturdy central support and attach slats of decreasing length, checking the spacing as I work from the bottom to the top. The base needs to be stable enough to prevent the structure from tipping over. For outdoor use, I would choose materials and finishes appropriate for exposure to moisture and temperature changes, and use lighting specifically rated for outdoor conditions. A large bow is an easy finishing touch that gives the simple silhouette a recognizable holiday accent.
Handmade Felt Christmas Tree with Colorful Ornaments
A small green felt Christmas tree stands in a red pot decorated with white lace trim and snowflake shapes. The tree itself is made from layered triangular pieces of green felt, with smaller green shapes creating the appearance of branches. Colorful round ornaments, pale snowflakes, and a reindeer decoration with a red nose and bow add playful details. The piece sits on a white shelf among several small decorative objects. I find this craft appealing because its soft materials and cheerful details give it a distinctly handmade personality.
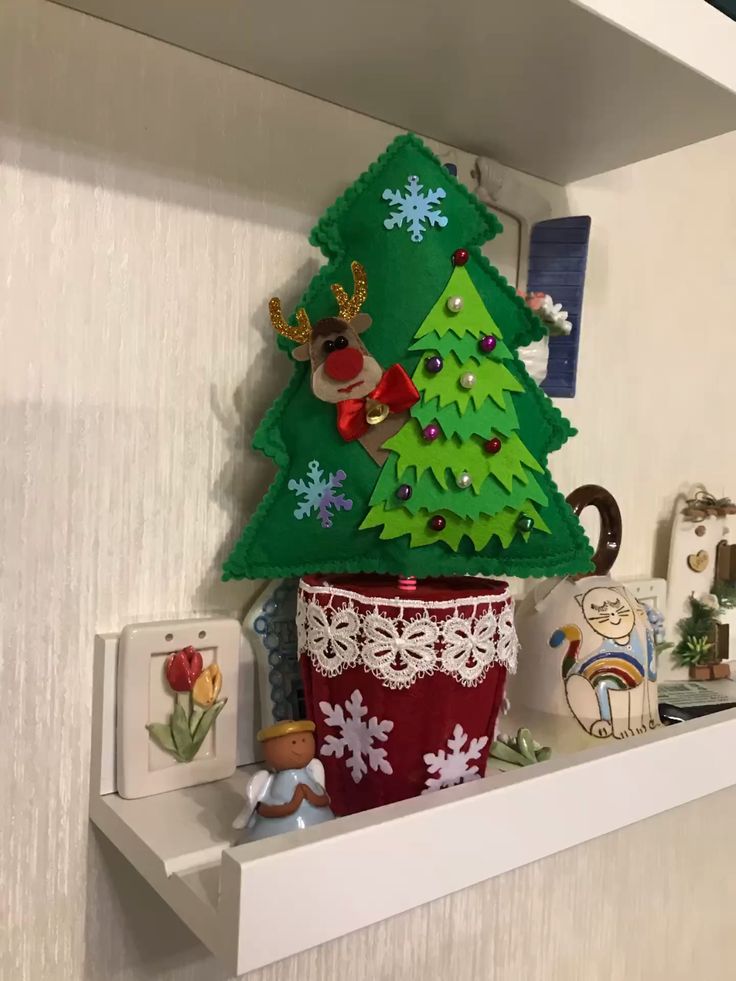
A felt tree is especially practical for a small display because it does not need a large stand or a complicated assembly. The lightweight material makes it easy to place on a shelf, desk, or tabletop, while the flat, layered shapes create the outline of an evergreen without requiring real branches. The combination of green, red, white, and small colorful ornaments gives the decoration a familiar Christmas appearance that can be adapted to suit different tastes.
For a similar project, I would cut several felt triangles in graduated sizes and layer them to create a tree silhouette. Small felt shapes, buttons, or lightweight craft ornaments can be attached to the surface, depending on the desired look. A decorated pot or simple container can serve as the base. If children are helping, I would choose age-appropriate materials and avoid small detachable pieces for very young children. The finished tree could also become a personalized seasonal decoration that is easy to store and bring out again each year.
DIY Christmas Tree Made from Kraft Paper
This unusual Christmas tree is formed from layers of crumpled kraft paper arranged around a tall conical structure. The golden-brown paper creates a full, rippled surface, with the folds catching the light and producing plenty of texture. Red baubles, star-shaped ornaments, and a strand of small lights are distributed across the tree, while a red star tops the design. At the base, flat gingerbread-person and candy-cane decorations add a playful finishing touch. I like how an everyday packaging material becomes the main feature of such an expressive holiday display.
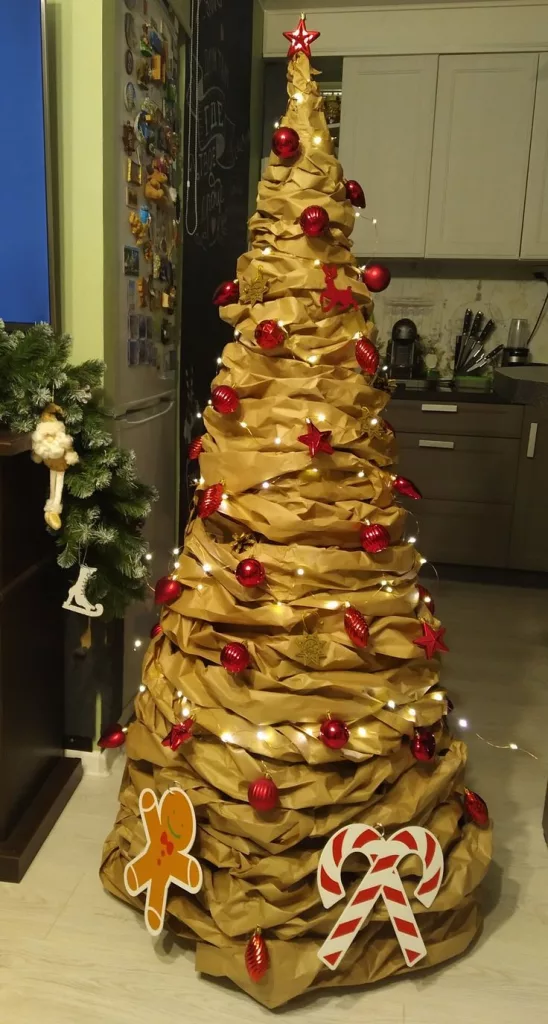
The strongest feature of this craft is its use of texture instead of traditional evergreen branches. The repeated paper folds create depth and volume, while the red ornaments stand out clearly against the warm kraft-paper color. This approach can also be adapted to use leftover packaging paper, making it an interesting option for people who enjoy reusing materials they already have.
To recreate the look, I would build a stable cone-shaped framework and attach crumpled paper in overlapping layers, starting at the bottom and working upward. The paper should be secured firmly enough to maintain its shape without being compressed into a flat surface. Once the cone is covered, lightweight ornaments and battery-operated lights can be added. Because paper is combustible, I would keep this tree away from candles, fireplaces, heaters, and other sources of heat, and avoid using hot incandescent lights.
Green Paper Loop Christmas Tree Craft
This small green Christmas tree has a full, rounded silhouette made from numerous folded or looped paper strips arranged in overlapping rows. The strips alternate between deep green, turquoise, and yellow-green shades, giving the surface a colorful layered effect. Small gold and silver spherical decorations are attached throughout the tree, and a decorative gold-toned topper completes the design. The tree stands directly on a tiled floor against a plain, light-colored background, allowing its shape and colors to remain the main focus.
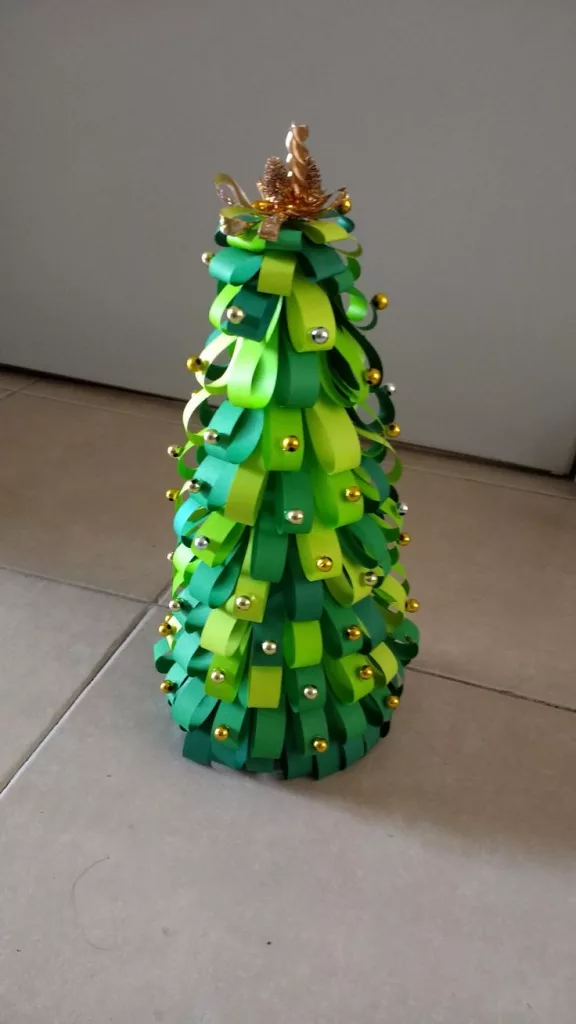
I like this design because the repeated paper loops create a sense of fullness without the need for branches or bulky materials. The different green tones add depth, while the metallic ornaments introduce small highlights across the surface. Since the construction is based on repeated shapes, the project can be made larger or smaller depending on the amount of paper available and the space intended for the finished decoration.
To make a similar tree, I would prepare strips of green paper in several shades and fold or loop them into consistent shapes. These pieces can then be attached in overlapping rows to a cone-shaped base, beginning at the bottom. I would keep the loops evenly distributed to create a balanced outline and use lightweight decorations that will not pull the paper out of place. For a more coordinated appearance, I would limit the palette to two or three green shades and repeat the same metallic accents throughout.
DIY Christmas Tree Made from a Camera Tripod
A silver camera tripod becomes the framework for an unconventional Christmas tree in this simple, modern-looking arrangement. Its three legs spread outward to form a triangular silhouette, while strands of white beads wrap around the structure in several horizontal and diagonal lines. Red spherical ornaments hang at different heights, creating a strong contrast against the metallic frame and neutral walls. The tree stands on a warm wood floor beside a large window, and its exposed construction gives the entire project a playful, handmade character.
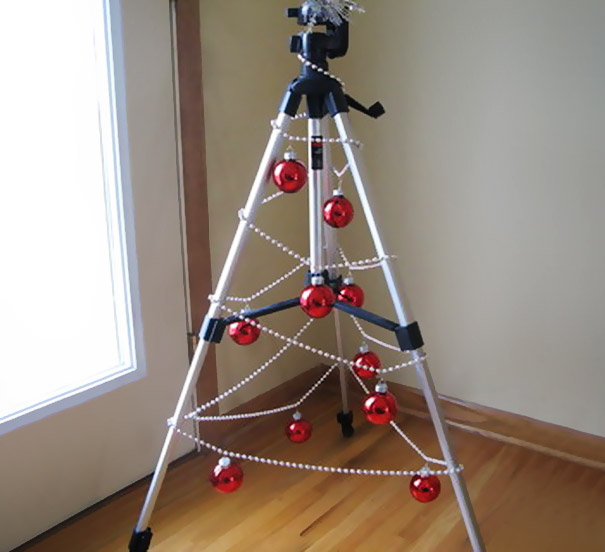
I like this idea because it transforms an ordinary piece of equipment into holiday decor without requiring a conventional tree stand or a large collection of branches. The tripod already provides the basic structure, and the open design makes the decoration visually lightweight. Red ornaments bring a familiar Christmas touch, while the white bead garlands create the suggestion of a tree’s layered branches.
To make a similar version, I would use a stable tripod that is no longer needed for photography and decorate it with lightweight garlands, beads, or string lights. Before hanging anything, I would check that the legs lock securely and that the ornaments are balanced. Lightweight decorations are preferable because a tripod is not necessarily designed to support the weight of a fully decorated Christmas tree. The finished piece could work well in a compact living room, creative workspace, or apartment where a traditional tree would take up too much room.
DIY Christmas Tree Made From Family Photos and Lights
This wall-mounted Christmas tree is created from a collection of photographs arranged in a tall triangular composition across two adjoining gray walls. The images include portraits, family moments, animals, and other personal memories, with several photographs placed at different angles to form the tree’s outline. A strand of warm-white lights runs around and between the pictures, highlighting the arrangement. A small illuminated golden star crowns the display, while the wall corner gives the composition a natural central axis.

I love the personal meaning behind this idea because the tree becomes more than a seasonal decoration. Instead of relying on traditional ornaments, it tells a visual story through photographs that can remind family members of favorite experiences and important people. The triangular arrangement creates a recognizable Christmas silhouette, while the lights add warmth and help the photographs stand out against the gray walls. It is also a practical alternative for small rooms because the entire display remains vertical and leaves the floor clear.
To make a similar photo tree, I would first select photographs with a mix of close-up portraits and wider scenes, then arrange them on the floor to establish the overall triangular shape before attaching anything to the wall. I would use removable picture strips or other wall-safe fasteners suited to the weight and finish of each frame or print. Warm LED string lights can be placed around the perimeter and threaded between the photographs to emphasize the outline. A small star at the top completes the design, while leaving enough space between pictures helps every memory remain visible.
Minimalist Christmas Tree Wall Art
This wall-mounted Christmas tree is created from a simple white outline that traces the familiar stepped silhouette of an evergreen. Small round decorations are scattered along the outline and inside the shape, adding dimension without making the design feel crowded. The arrangement sits above a pale floor beside a fireplace filled with neatly stacked logs. A short cylindrical wooden stool with a candle and the soft texture of a light-colored rug complete the scene. I appreciate how the tree becomes part of the wall itself rather than occupying valuable floor space.
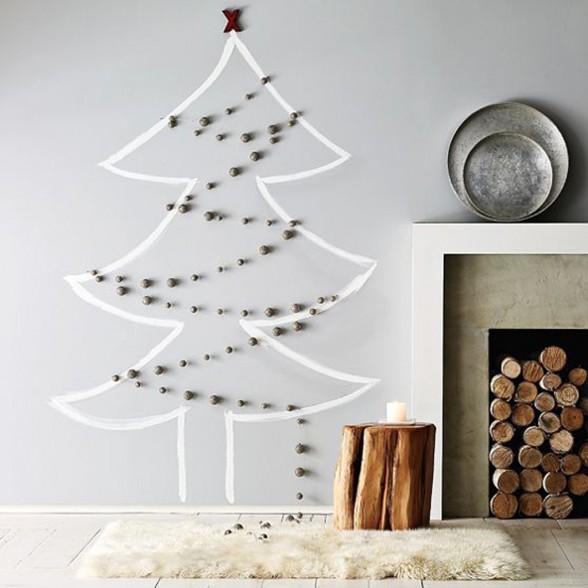
The greatest advantage of this design is its compact footprint. It creates a recognizable holiday focal point while leaving the surrounding area open and easy to use. The simple outline also works with the room’s restrained palette, allowing the fireplace and natural wood details to remain visible. Unlike a freestanding tree, this version does not need a stand, branches, or a dedicated area for presents.
I would recreate it with removable wall-safe tape, a thin cord, or another material that can be attached without damaging the finish. Small lightweight ornaments can then be secured along the outline or arranged within it. Before starting, I would measure the wall and lightly mark the tree’s proportions so that its branches remain balanced. A short strand of warm-white lights could add a gentle glow, provided the lights and attachment method are suitable for the wall surface.
Creative Christmas tree crafts make holiday decorating more personal, meaningful, and fun. With a little imagination and a few simple materials, you can create unique decorations that bring warmth and festive charm to every corner of your home. Choose your favorite DIY ideas, experiment with different textures and colors, and enjoy making holiday decor that reflects your own style.